Wednesday, December 26, 2007

USB Device History

I have modified the USB device history EnScript a little to generate a error dialog box if you do not have a case open when trying to run the script and if you run the EnScript with multiple pieces of evidence, the output is now separated and a line at the top of each output indicates where the information was obtained.


Download Here V5 (.enscript)
Download Here V6 (.enpack)

Friday, December 21, 2007

Some damn funny forensic humor

A friend of mine who has a private forensic consulting firm received a phone call today from a guy who started rambling on talking all sorts of crazy talk. After hanging up on the guy, he proceeded to call back about 20 times and eventually left three voice mail messages.

The only editing I did was to remove his phone number from the recordings and part of his name to protect the innocent, guilty, mentally insane or heavily drugged..

Those of you in LE know these types of calls are pretty common to dispatch, etc. But these just struck me as "extra" funny!

Warning: There is some profanity in the messages. Also be sure and empty your bladder before listening.

Listen at your own risk:

Voice Message1
Voice Message2
Voice Message3

EnScript to export hashes from SearchPak .spak file

A reader contacted me about the possibility of exporting the hashes used by the SearchPak program made by ADFSolutions so they could be imported into EnCase, as he had several hundred thousand hashes in the SearchPak program. I asked for a sample of the file that contains the hash values in the SearchPak application and found they are stored in a XML type text file with a ".spak" extension.

I wrote a quick EnScript that parses the XML type .spak file and then exports all the hashes to a text file in the default export folder of EnCase. You can then use the EnScript I previously wrote here to read hashes from a text file and create a EnCase hash set.

Written for EnCase v6
Download Here

Monday, November 19, 2007

Vista Volume Shadow Service (VSS) Information - Assistance Request

*Edit 11/20/07 - For clarity, I renamed this blog to Vista VSS information since that is actually the information I am trying to extract, not the System Restore Point information.

Windows Vista introduced several new features, one of which I think will have a huge impact on computer forensics, that being the "Previous Version" feature. The "Previous Version" feature uses the Volume Shadow Service present in Windows 2003, but brings it to a new level by making block level copies of clusters that can contain user files (documents, images, etc).

I have been looking into the new VSS storage method and I think I have found a way to extract some good information about the VSS (step one). Then once I get that figured out, I hope to write an EnScript that might be able to extract the files that have been stored inside the VSS.

This is where I need some assistance from those who have a either running Vista machine with EnCase loaded or image file of a Windows Vista system that can be viewed in EnCase 6. I have written an EnScript to highlight a record of information in the VSS files, but I am not sure yet what the various differences can be based on types of machines, number of drives, etc. So I am asking for assistance by downloading and running the EnScript below and then submitting that back to me so I can compare the various records to see what the differences are.

The EnScript below searches for a record identifier, then bookmarks possible valid records. It also exports the record to a raw file in your default export folder (one file for every valid hit). My Initial research shows one record is present for each VSS file in the "System Volume Information" folder.

The EnScript is not compiled and is readable by anyone, so you can see what it is doing. I have heavily commented each line of code to explain what the EnScript is doing, line-by-line. It is fairly simple. It is looking for a hex value present at the beginning of each record, then reading a value which indicates the length of the record and then bookmarking/exporting that record. The record does not contain anything I consider super-sensitive. The record does contain the name of your machine, the workgroup/domain it belongs to, your machine GUID, some timestamps, the VolumeGUID and the label of the volume.


If you are uncomfortable with sending me this information, thanks for your interest, but stop here.

For those willing to send me this information, please download the EnScript below, preview/load a Windows Vista system in EnCase 6, select all files with GUID names in your "System Volume Information" folder and then run the EnScript.


Once completed, look in your default export folder (C:\Program Files\EnCase6\Export), review the contents to make sure you are comfortable with sending me the contents. Feel free to edit any of the Unicode strings (machine name/domain name, etc) in the exported data with an editor to redact anything you don't wish to share with me, just be careful to preserve the original format of the record. If you are then comfortable nothing sensitive is contained in the files, zip up the exported files and send them to me at lance (at) forensickb.com. I will not be sharing any of the submitted files with anyone else. Please indicate when sending information, what version of Vista it is.

Those of you who participate and send me exported data, I will send you beta/final versions of the EnScript as a token of appreciation for your assistance in its development.

Written for Encase v6

Download Here

Thursday, November 15, 2007

New EnScript Features in EnCase 6.8

As I blogged about earlier, EnCase v6.8 was released yesterday (11/14/07). For no other reason than the new EnScript features, you should consider upgrading. There is a long list of fixes and enhancements, but the new EnScript features are very cool.

The first new feature seems trival, but its a very welcome addition to now have line numbering. It is turned off by default, but if you go to "tools" -> "options" -> EnScript Tab. There is now a checkbox that says "Show line numbers".


Checking this box will immediately enable line numbering in any/all EnScripts you may have open for editing. Then, when you compile the EnScript if there are any syntax errors, EnCase will generate an error in the "Output" tab and show you the vertical line number and horizontal position of the code that generated the error.


Very cool!....

The second new feature is even better! You can now do real-time debugging of an EnScript, including setting breakpoints and watching variable values during execution.

How it works
To enable this feature, you need to first create a project. In EnCase, select "View" -> "Projects". In the Table pane (upper right), right-click anywhere and choose new (or press the Insert key). Name your project whatever you want and then select the EnScript you want to debug:


Once you select "OK", go back to the EnScript editing window and you should see the "Run" button has been replaced by a "Start Debugging" button. You can now set a breakpoint by clicking your mouse anywhere on the left column where the line numbers are now displayed. This will cause a red ball to appear on the line you clicked on, enabling a breakpoint on that line (you can set multiple breakpoints). Then when you run your EnScript, program execution will pause when it reaches the line where you placed the breakpoint. You can then continue, step over, step into or break the execution at that point. You can also view the value of all the variables at that point of execution in the lower view pane.


Very nice....Although its not yet a full-featured IDE, this will definitely help when debugging and developing an EnScript!

EnScript to export x bytes around search hit with HTML report

A few weeks ago I posted an article and EnScript to export x bytes around a search hit. You can read about it here.

I received an email from a reader asking if I could modify it to create an HTML report of the search hits, with the search hit being highlighted in red and then some additional information in the report. Seeing how there was nothing interesting on TV, I took the time to modify the existing script to create an HTML report.

How it works:
Run your keyword search against your evidence. Once the search is complete, view your search hits, then select (blue check) the ones you want to export (one, many, all). Then run the EnScript. The EnScript will take each search hit that you have selected and carve out the text around the keyword depending on the before and after integer values you provided (2000 before and 2000 after is default). This new version will also create a simple HTML "Proximity Report" in your default export folder if you select the "Create HTML report" check box on the starting menu.


The HTML report is nothing fancy, but I guess it serves the purpose.


Both are written for EnCase v6

New version with HTML report
Old version with no HTML report

EnCase v6.8 is now available

EnCase v6.8 was released yesterday. This version has several bug fixes and some changes to the interface that may take a little getting used to.

Head over to https://www.encase.com/myaccount/registration.aspx, input your dongle ID and you will receive an email with a link to download the latest version.

Wednesday, November 7, 2007

Extract MFT records from Memory dump

I have been following the development of several tools to extract evidence from memory dumps of live machines. There have been several tools developed to assist with this, including several listed on Andreas Schuster's blog.

Traditionally, examiners would run the "strings" command against collected memory dumps (if they had them) and that was it. In the past two years some tools have been developed and showcased during the DFRWS and other various conferences. Some of the tools attempt to extract the running process list from the captured memory.

I decided to start developing some tools in EnScript to extract information from memory dumps. I have 'tools' in mind that I want to develop and this is the first one. This EnScript will search any selected (blue checked) file in EnCase for MFT records, based on the MFT record header of FILE* or FILE0. Once found, the EnScript will attempt to parse out the Standard Information Attribute for the timestamps associated with the file/folder and then all Filename Attributes for the name of the file and the associated timestamps stored in the Filename Attribute. The idea behind this EnScript is that there may be MFT records in memory (typically thousands) that are of interest to you, such as malware or hacking tools, etc.

Any successfully parsed records will be written to the console and also bookmarked.

How it works:
Typically, memory dumps are collected as one large 'dump' or file that contains the contents of memory. If you add that file into EnCase (drag and drop into an open case), then select that one file and run the EnScript, all parsed records will be displayed in the console and bookmarked.

What it collects:
It currently parses any found MFT records for the Standard Information Attribute data and also the data contained in the Filename Attribute, including the filename and associated timestamps.

What is does not parse:
The EnScript currently does not parse out directory entry contents. Each directory has its own MFT record (which will be parsed), but the contents of that directory is either stored as resident data in the MFT record or as non-resident data in a INDX buffer. Currently this EnScript does not parse and display the contents of directories.

Written for EnCase v6

Download Here

Tuesday, October 30, 2007

EnScript to read Windows Vista Firewall rules

I was messing around with some Vista stuff and I noticed that it maintains the firewall rules (exceptions) in the registry differently than in Windows XP/2K3. They can be found here in the registry:

HKLM\SYSTEM\CurentControlSet\Services\SharedAccess\
Parameters\FirewallPolicy\FirewallRules\

So I decided to write an EnScript that reads the firewall rules and displays them in the console as well as creates some bookmarks. The EnScript, parses the SYSTEM registry hive and reads the firewall exceptions on a Windows Vista system. It then prints out all the ACTIVE firewall exceptions to the console.


In addition, three bookmark folders are created: All Active Firewall Rules, Active Firewall Rules with local port exception & Active Firewall Rules by Application. The first folder contains all the ACTIVE firewall exceptions. The second one only contains the ones that specify a local port exception and the third contains all of ACTIVE port exceptions but the first field is associated application so you can sort and look at what applications are associated with that exception.


Written for EnCase v6

Download Here

Sunday, October 28, 2007

EnScript Tutorial Part III

After being gone out of the country for nearly 6 weeks, I finally have some time to continue this tutorial.

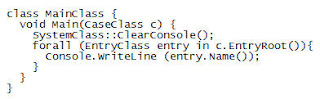
In Tutorial II, we finished by building a basic EnScript that recursed all the evidence and printed the name of every object to the console. In this tutorial we will take it one step further and begin to make decisions based on certain criteria. In Tutorial II we finished with the following code:


The next step is to use conditional control structures to select only certain files based on certain criteria.

One the foundational conditional statements is a "IF" statement. An example of an IF statement is the following:

if (entry.Name() == "system"){

}

As the EnScript recurses the evidence, it will evaluate each object in the evidence to see if the name field is equal to "system" by answering the questrion of is it "ture" or is it "false". If it is "true", then any code in the curly braces will execute. It is important to note that this type of evaluation is case-sensitive and must be exact, so "System" or "System.dat" evaluate to be false with a file named "system" and the code in the curly braces would not execute.


In the above code, we have inserted the "IF" statement, but notice there are no curly braces as shown above. There are two ways to do control statements, the first is to use an opening curly brace and then a closing curly brace, putting any code you want to execute if the evaluation is true, inside the braces.

The second way is to not use any curly braces and then if the conditional statement evaluates true, then the very next line will be executed. If it evaluates to false, then it will skip the very next line. So in the example above if "if (entry.Name() == "system") is true, then the next line "Console.WriteLine" will execute. If it is false, then that line will be skipped and the script will effectively end, but if there were additional lines of code after the Console.WriteLine command, then they would execute, but in this case, there are not, so the script ends.


EnCase provides a few built-in functions to help make matching text a little easier. The first one I will discuss is the Contains() function. The Contains() function is a built-in function that will look inside a test string for a fragment and then return true id that fragment is inside the initial string. For example:


if (entry.Name().Contains("sys")){
// code goes here
}


In this example, as the EnScript recurses each object in the evidence it will evaluate the name field to see if it "contains" the letters "sys". If it does, then it evaluates true and the code inside the curly braces would execute. The Contains() function is not case-sensitive and it does not matter where the string fragment is located inside the initial string. The file name "system.dat" would evaluate true, as would the file named "mmsystem.dll" since they both have "sys" inside them somewhere. To learn more about internal functions such as Contains(), you can select the EnScript Types from the "View" menu. The Contains() function is a member of the String Class. If you look in the String Class, you will see the Contains() function and a brief syntactical explanation of its use.


If you need to evaluate based on case, then you cant use Contains(), but you could use the Compare() function. The Compare () function takes two inputs, the string you want to evaluate and then a Boolean value to indicate whether you want to evaluate on case sensitivity. For example:


if (entry.Name().Compare("system", true) == 0) {
// code goes here
}


The Compare() function returns a non zero value for any text which is lexically less than or greater than the test you are looking for. If the text is exactly the same, the Compare() function returns a zero (I know, it seems reversed since a zero traditionally means false in Boolean). This is why there is a "==0" at the end of the statement. This statement would evaluate true only if the file name was exactly "system", not "System" or "system.dat".


Once you have used an control statement such as "IF", you probably want to do something with that file, like read text from it or bookmark it. In this tutorial I will introduce the method to bookmark a specific file based on some type of criteria, such as the examples above. In future tutorials, I will detail how to open and read data from a file (file I/O).


To bookmark a object, you should first create a folder to put your bookmarks in. You could just bookmark your file in the root of the bookmark tree, but that would be messy and disorganized. To create a Bookmark folder to later place your bookmarks into, you use the following statements:


BookmarkFolderClass folder;
folder = new BookmarkFolderClass(c.BookmarkRoot(), "My Bookmark Folder");


The first line creates a variable named "folder" of the BookmarkFolder Class type. Then, the second line instantiates (creates) the object named "folder" in the root of the bookmark tree, naming it "My BookmarkFolder".


The next step is to then bookmark any files or folders that you want with the following command:


folder.AddBookmark(entry, 0, entry.LogicalSize(), entry.Name(), BookmarkClass::SHOWREPORT, BookmarkClass::LOWASCII);


I will break this down into segments. The first segment is "folder.AddBookmark". Above, you created a reference to a BookmarkClass object named "folder". To add bookmarks into that folder, you use the function AddBookmark(). The first segment says "add a bookmark into the "folder" object.);


The second segment are the inputs that the function expects to tell EnCase WHAT to bookmark, WHERE to bookmark and how to name the bookmark, as well as how to display it in the bookmark tab.


The first input (entry) is the entryclass object that you want to bookmark.


The second input is where do you want to start the bookmark from, in this example, from the beginning of the file (zero).


The third is the ending bookmark offset. In this example, to the end of the logical file.


The fourth input is the name of the bookmark as you want it to appear in the bookmark tab, in this example, the name of the file/folder object


The fifth input is the options, such as show in the report, show as a picture, etc. In this example, it will be shown in the report view of the bookmarks


The sixth input is the viewtype. This tell EnCase how to display the data you have bookmarked. Should EnCase show it in hex, Ascii, a timestamp or HTML page. In this example display low ascii characters (<128). Our finalized code using the examples explained above is:

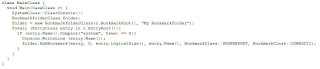
This EnScript will recurse all evidence and look at each object for a file name or folder that is exactly "system". When found it will then bookmark that file/folder from the very beginning of the file to the end of the logical file. After running this EnScript, you should have a bookmark folder named "My BookmarkFolder" in the root of the bookmark tab and any files that matched this criteria, would be bookmarked in that folder.

Saturday, October 27, 2007

Online Virus scanners & Sandbox

When doing investigations, I commonly come across files that I either suspect are viruses/malware or that I am not sure what they do, and I am looking for some help determining what a specific file does before I invest the time to sandbox it on my own and do a dynamic analysis.

The two sites I use most often for AV detection are:

VirusTotal
Jotti

Both of these sites use multiple AV detection engines to scan the file that you upload and then present the results, usually within 60 seconds or so. This can give you a headstart and indication if you are in fact dealing with a virus or some type of malware. As always, the fact that nothing is detected is not a guarantee that it is not malware, in fact, I have found many executables that come back clean and then when I do the dynamic analysis, it is in fact malware that the AV companies have not included a signature for.

The third site I use has a large database of hash values for know good and know bad files. You can paste the hash value of a file into their web interface and it will tell you if that hash is in their database and come back with a green or red indication. Green being an application they recognize by hash as not harmful (i.e. calc.exe, or cmd.exe). Red indicated they recognize the hash value as some type of malware or hacking tool. The site is free and no registration or information is required to input the hash value of any file to see what their database has on that file. If you register with them (free), you can download a win32 app that adds a right-click (shell extension) option that you can use to right-click on any file and select fileadvisor and it will hash the file and send it to the database and then display the results. The URL for this service is:

Bit9

The last site I will mention is a virtual sandbox. You can upload a file and then the service will run it and provide all sorts of interesting information about the file, such as what dlls it loaded, what files it opened, modified or created, any network connections it may make and or any DNS name resolutions it requested and any registry access. It certainly provides the initial basic information of a dynamic analysis and quite frankly has saved me a lot of time in the past. The site is free, although you have to provide an email address where the link to the report will be sent. If the file is known to the database, it will tell you it has already been submitted in the past and immediately allow you to view the report. If it hasn't been submitted before then it sandboxes the file and then you will receive an email in a few minutes with a link to the full report. This is where mailinator comes in handy.. ;) The URL for this service is:

Sunbelt Sandbox

As usual, use at your own risk and take the results with a grain of salt.

If anyone has any other sites they find useful, please feel free to comment and post them.

Tuesday, October 23, 2007

EnScript to detect use of "slacker.exe", anti-forensic tool

I was playing around with "Slacker", an anti-forensic tool that hides data in the file slack area of various files. The tool has been around for quite awhile and I have heard of its use a few times in real investigations, so I decided to finally write an EnScript to try and detect its use.

I am not into all the anti-forensic hype that goes around the Internet and various conferences, so I usually don't spend a lot of time trying to defeat anti-forensic techniques, they usually defeat themselves. In this case, I had some time to kill and decided to write something to try and detect data hidden with the slacker utility.

I have tested this with two versions of slacker. The one currently available for download as of today and an older verison I had archived:
53245db399ae003e82fdecb0871e66d3
8eb607073ad05c64fde292224d15b475

Written for EnCase v6.

Download Here

EnScript to export x bytes around selected search hits

A friend was doing some eDiscovery work and needed to export some search hits for review by an attorney. He decided he wanted to export some of the text around the search hit so the reviewing party would have some context to evaluate the located search hit.

This EnScript was written to export x number of bytes before and after a selected search hit. To use, perform your keyword search like normal, then select (blue check) the search hits you want to export and run the EnScript. The EnScript will export whatever number of bytes before and after that you specify. If the search hit is closer to the beginning or end of the file than the number of bytes you specified to be exported, then the available amount of data from the beginning or to the end will be exported.

Written for EnCase v6, but should run in v5

Download Here

Tuesday, September 11, 2007

EnScript Tutorial - Part II

This is the second part of the EnScript tutorial I started in September 4th, 2007. In the first part, we reviewed what the differences are between EnScripts, Filters, Conditions and Queries. In this part, we will begin to learn the EnScript programming language.

First, I want to review the various panes in EnCase and their respective names so when I refer to a particular tab or pane, you understand where I am referring. The EnCase program is generally divided into four panes or sub-windows.


The upper left pane (A) is referred to as the “tree pane”. The upper right pane (B) is referred to as the table pane. The lower left pane (C) is referred to as the view pane and the lower right pane (D) is the EnScripts/Filter pane. The table pane generally shows you all the “objects” or files & folders in a particular piece of evidence. The view pane is used to see the contents of a specific file or folder in various formats (text, hex, doc viewer).

Writing your first EnScript:
What programming tutorial would be complete without the traditional “hello world” programming example? In the EnScript pane (lower right), make sure the EnScript tab is active and then right-click on the root of the EnScript tree that is displayed. Select “New” and then name the EnScript “Hello World”. A new EnScript should be created with the name you provided. The table pane (upper right) should have automatically made the “code” tab active and you should see the minimum EnScript code generated automatically by EnCase.

As I mentioned in the first part of this tutorial, this is the minimum amount of code that must be present in order to be a valid EnScript. This EnScript will run, but will do absolutely nothing. Every EnScript must have a Main Class as well as a function called “Main”. Take a look at the opening curly braces and then the corresponding closing curly brace. The Main function is contained inside the Main class. In this EnScript, line two and three makeup the entire Main Function, while lines one and four are the beginning and ending portions of the Main class. For now, lets focus on the Main function. Absent a constructor, which I will explain later, the first line of the Main function is where this EnScript begins execution. Line two “void Main (CaseClass c)” is where it will start.

When this EnScript begins, the EnCase program is going to hand your EnScript one variable, named “c”. This variable is of the CaseClass type. This means that when you program begins, you will have a reference to the case that is open and active in EnCase at the time the EnScript was executed. CaseClass refers is a type definition describing what type of variable “c” is. With this one variable, you can obtain additional references or pointers to all the other information you may need in your EnScript. This is your starting point. Generally, program execution stops with the corresponding closing curly brace of the Main function (line three).

Here are some basic formatting rules when writing EnScripts:

• White space is generally ignored (the exception is when inside double quotes). So putting extra spaces between lines of code means nothing and it can help to logically separate various pieces of your code .
• To make comments in your code (for future reference or explanation) you can comment one line of code using two forward slashes “//”. Everything after that will turn blue and be ignored at run time. To comment blocks of code, you can use the ANSI C commenting style of a “/*” and then end your commenting block with the opposite “*/”. Anything in-between those markers will turn blue and will be ignored. Those markers can be on the same line, or then can be 100 lines apart and everything in-between will be ignored.
• Get in the habit of indenting your code inside functions, control structures or conditional statements. It makes your code easier to read and helps when debugging for errors
• When writing code inside EnCase, Control-Z is the hot key for undo. So if you delete something or change a piece of code, but then want to undo your change, Control-Z
• Control-F can be used to find specific text in your EnScript. When working with small EnScripts, finding text is not too difficult, but with larger ones, it helps to find variables, functions or specific text.

In the view pane, there is a tab named “Console”. This tab is an output window for when you want your EnScript to write out information. You generally do not want to write important information, but instead use it as a kind of debugging window to write out the status of your EnScript or to debug. The method of writing to this console tab is “Console.WriteLine()”. So to write “hello world” to the console, you would use :

“Console.WriteLine(“hello world”);

Notice that the text you want to appear in the console tab is inside of double quotes and that the line ends with a semi-colon. You will generally end every line with a semicolon. The exception is control statements and other opening statements (such as the first line of a class declaration or function). Your code should look something like this:

class MainClass {
  void Main(CaseClass c) { // Execution starts here
    Console.WriteLine(“hello world”); // Writes out to the console tab
  } // Execution stops here
}

If you now click on the run button at the top of EnCase and then take a look at the console tab, you should see “hello world”. If you run it again, you will see “hello world” twice, once from the first time you ran it and once from the second time. To programmatically clear the console each time you run an EnScript, you could add “SystemClass::ClearConsole();”

class MainClass {
  void Main(CaseClass c) { // Execution starts here
    SystemClass::ClearConsole(); // Clear the console
    Console.WriteLine(“hello world”); // Writes out to the console tab
  } // Execution stops here
}

Recursion:
The definition of recursion in the programming world is a piece of code that calls itself. When the EnScript language initially came out, you had to use a recursion routine in order to process or list all the files/folders in the evidence. The current version of EnScript makes it much easier. In order to list or process (do something) all the files/folders in the evidence, you first need to create an object that contains a pointer to the top level of the evidence. Information that is listed in the table pane (upper right) windows are members of the EntryClass.

The previous script did not require a case to be open because it was simply writing to the console. The remainder of this tutorial will require you to have a case open and some evidence loaded.

Remember that EnCase hands you one variable when it starts an EnScript: “CaseClass c”. There is a built-in method that is part of the CaseClass that can give you the top-level entry in the evidence using the method “c.EntryRoot()”. You could use the code:

EntryClass entry = c.EntryRoot();

This would get the first (think of how a hierarchical directory works with a top level root directory) root entry in the evidence. You could then print the name of that object out using the Console.WriteLine() function:

class MainClass {
  void Main(CaseClass c) {
    SystemClass::ClearConsole();
    EntryClass entry = c.EntryRoot().FirstChild();
    Console.WriteLine (entry.Name());
  }
}

This code would clear the console, then assign the first object (the first physical or logical device in the evidence)in the evidence to the EntryClass variable named “entry”. Then the next line will print the name of that object out in the console pane.

This is a good beginning, but this only gets us the first object in the evidence. What if we want to print out every file/folder name int he evidence? Luckily there is a internal function that makes this *very* simple. If you are familiar with Perl, you should be familiar with "forall" function that goes through a list or array, one object at a time. In EnCase it works the same way by going through every object in the evidence given the top-level object.

class MainClass {
  void Main(CaseClass c) {
    SystemClass::ClearConsole();
    forall (EntryClass entry in c.EntryRoot()){
      Console.WriteLine (entry.Name());
    }
  }
}

This code clears the console (line 3), then receives the top-level object in the case and assigns it to the variable named "entry". It then executes all the code after the forall statement until the closing curly brace (line 5), then goes back to the forall statement and gets the next object in the case and runs the code in between the curly braces again, until all the objects have been processed.

If you look in the console tab, you should see a complete listing of all the file/folder names from all of the loaded evidence. This technique is a foundational technique that will be used to list/process all files in a case.

In the next tutorial, we will begin to identify and process file/folders based on certain criteria.

Tuesday, September 4, 2007

EnScript Tutorial - Part I

This will be the first tutorial in a series in an attempt to try and teach some basic EnScript concepts. First, some disclaimers: I am not a programmer by profession. I have learned the EnScript language out of necessity to automate processing of evidence and have since written many EnScripts, some of which are now part of the public release version of EnCase and some of which are given to students during EnCase training, but I certainly don't consider myself an expert in writing EnScripts.

The purpose of this tutorial is to try and provide some basic concepts and instruction to an EnCase user who also does not have any programming experience so they can write some basic EnScripts and/or modify existing ones for a specific need.

I have been teaching various EnCase training classes for almost the past 5 years and it amazes me at the answers I get from students when I ask about EnScripts, Filters and Conditions. Most know they are in the lower right pane of EnCase and many know some of the “canned” EnScripts that everyone seems to use (Initialize Case), but very few can describe filter, conditions or queries. So lets first discuss these four topics so you understand their differences and understand which may be the better solution to your automation need.

EnScripts

The EnScript tab gives you access to the built-in EnScript editor and allows you to see the code for the EnScript, as long as it isn’t compiled (EnPack format). An EnScript is the most powerful automation feature but it is also the most raw. “Raw” meaning that the EnCase software does very little for you automatically and your EnScript is responsible for doing everything you want to do, unlike a condition that we will discuss later. The EnScript programming language is very “Java-ish” and C++. If you have any experience with those two languages, then learning the EnScript language should be a snap.

An EnScript can do almost anything you want. It can access just about everything you the user can access or see inside EnCase. It can create folders and files on the local file system (not the evidence, the evidence file can never be altered via EnCase). In the Enterprise Edition, it can create directories and files on remote machines as well as delete them. It can also execute other win32 programs.

When you create an EnScript for the first time, EnCase provides the absolute minimum code for you:

class MainClass {
       void Main(CaseClass c) {
       }
}

This code will run, but does absolutely nothing. It is just the absolute minimum code that must be present to be a valid EnScript. When writing an EnScript, you are responsible for writing everything else. EnCase does nothing automatically for you.

Filters
A filter is an EnScript. It is the same language. The only difference is that a filter is designed for a specific purpose, to filter what you see. The original concept was to filter our files/folders based on some type of criteria; i.e. file extension, size, name, whatever. EnCase treats filters a little different than raw EnScripts. This is because EnCase is actually doing some work behind the scenes for you in an effort to “filter” what you see in the evidence. The code in a filter can do just about anything a raw EnScript can do, but it must answer one important question. Do you want to see files/folders (called entries) that match your criteria? If you do not answer that question in your code, your filter will not run.

EnCase actually does some background processing for you with a filter by automatically recursing all the evidence. Recursing means it looks at every entry in your evidence and then asks you, do you want to see this entry or do you want to hide it from view? Here is the minimum code required for a filter:

class MainClass {
       void Main(EntryClass entry) {
          return true;
       }
}

There are two major differences between this code and the code presented above. First, the parameter being passed to the main function is different (CaseClass c vs. EntryClass entry) and the second being the one added line that states, “return true”. This line is responsible for answering that question I mentioned above, “Do you want to see this entry or hide it from view”? So with a filter, EnCase gets every entry in all your evidence, one by one and then executes this code for every entry. It reads the above code that says “return true”, meaning show me this entry. EnCase then gets the next entry and does it again, until it goes through every entry in your evidence. If you have 20,000 entries in a piece of evidence, then this code will execute 20,000 times. If you changed the line to say, “return false”, EnCase would hide every single entry from your view until you removed the filter.

Conditions
A condition is exactly the same as a filter, except you don’t need to know how to write EnScript programming language. The condition tab allows you to use user-friendly criteria or selections to automagically write a filter. By selecting certain criteria, such as name, contains, “mytext”, EnCase will automagically generate the necessary EnScript code to perform that filter.

Queries
A query is nothing more that two or more filters put together. The filter and condition tab have a limitation that only allow you to apply one filter at a time. By using a query for example, if you have a filter that only shows you files that are larger than 10,000 bytes in size and another filter that only shows you files with the extension of JPG, you could create a query that would take those two filters and apply them simultaneously, the result would be only files with a JPG extension whose size is greater than 10.000 bytes would be displayed.

In the next part, I will begin to explain the EnScript programming language and how to perform simple actions.

Monday, September 3, 2007

Find files based solely on the name - EnScript

I recently read a post on a listserv asking if there was any easy way to find files in an EnCase evidence file based on just the filename and then export those files out. This can easily be accomplished by creating a condition and then when applied, only the files matching the filename(s) you specified will be displayed. The files can then be selected (blue checked) and then exported out.

But what if your filename list contains 5000+ filenames? Well, I tried to create a condition with that many filenames and EnCase choked. That's because it actually writes the filenames that you paste into the text box into the code the condition makes, thus causing several thousand lines of code to be created.

So I wrote an EnScript that will do this pretty quickly by reading a simple (non-Unicode) text file containing one filename per line, and then recurses through all the loaded evidence and bookmarks any files that match the filename(s) you provided in the text file. I added an "Export" check box that will automatically export the found files to the default export folder, if selected. It will also hash the found files and then when exported, rename the file to the original filename with the hash appended so you could sort in Windows Explorer and then see if two or more files with the same name are duplicates or different.

When run, the following dialog box will require you to point to a text file containing the filename(s) you wish to locate, and then a name of a bookmark folder you wish to create (the default is the name of the script with the date & time):


Once run, the EnScript will bookmark any files that match the filename(s) you provided (it is not case sensitive). If you select the export option then it will export every occurrence of the file that matches the filename list you provided and then hash the file and append the hash to the filename (the number on the end is just a counter for uniqueness):


The console will report how many filenames were read from the file you provided and the full path of the files that match.

This EnScript actually has some useful application in Intrusion type investigations. I am constantly struggling to keep an updated hash set of hacker tools. Every time a new tool version is released I have to make sure and add that into my hash sets. Many times though, I have found that the intruder does not even rename his/her tools, he/she instead just hides them somewhere where we will never think to look (the system32 folder ;).

So, you could create a simple text file that contains all the names of the bad hacker tools that you would want to know if they exist in your evidence and then run this script at the beginning of the exam to possibly identify any low-hanging fruit, and jump start your investigation. This way if you don't have an complete updated hash set, you could still identify files whose name is clearly identifiable as a hacking tool. I call these contraband type tools. In other words the mere name of the file is bad and it should peak your interest, i.e. pwdump.exe, fport.exe, cain.exe, psexec.exe, etc...

This EnScript is compiled (EnPack) so it will only work in V6.
Download Here

Thursday, August 16, 2007

Import a text file of Hash values into a EnCase hash set.

In July, I posted an EnScript that I wrote to import a text file containing the name, size and hash value of file(s) into a EnCase hash set (You can read it here).

I have modified the EnScript to import a simple text file containing just hash values. This was based on a request by a reader and it was a simple chage to make. This new version now imports a simple ASCII text file containing one hash value per line:

937D87886E076C3A9DFC41AF47430E40
AB9A6395505AB2912FA4C6D7927CF359
8D7CDC05145498CC65585171C0084378
F248F38E1A22C94D52E8277AFC89FD90
AF64E5AE9080B01B61344B7C7AF9C972
633395C2507E03AFB2F7DCF34B2B8831
D41D8CD98F00B204E9800998ECF8427E
AB9A6395505AB2912FA4C6D7927CF359
254D506F104A52486B005F9B2C2D3C37
7D1844587162237957143B353679EFF6

The EnScript will create a .hash file in your default export folder that can then be copied into your EnCase\Hash Sets\ folder and used inside EnCase.

Download Here (v5 & v6)

Tuesday, August 14, 2007

EnScript to list wireless SSIDs the computer has connected to.

This is a real simple EnScript designed to parse the Wireless SSID information from the registry and list all SSIDs, along with the date field to the console Tab:


This should correspond to what the user would see in the list of preferred networks recently connected to on the live machine:


Download EnScript Here
Download EnPack Here

Tuesday, July 31, 2007

EnScript to obtain the MAC address of a non-running machine

A recent post asking how to obtain the MAC address of a non-running machine prompted me to write a quick EnScript to pull the data from the end of Link (LNK) files. The EnScript is nothing fancy, it simply recurses through all .LNK files and grabs the MAC address at the end of the .LNK file and prints it to the console.

Download Here

Monday, July 23, 2007

Decoding encoded IIS logs

When doing intrusion investigations, I have run across IIS web logs that have encoded entries that were the product of a SQL injection attack. Many times the attacker will encode the web request that is sent to the webserver and then subsequently to the SQL server by using ASCII values for the characters or HEX values. There are several reasons for doing this and there are several automated tools that an attacker can use that will automatically encode the string he/she wishes to send.

For example, imagine the attacker wants to send the HTTP GET request of :
"id=999999 or select * from cctable"

You obviously cannot send spaces in a URL, so it would be rewritten as:
"id=999999%20or%20select%20*%20from cctable"

Special characters are also usually never explicitly represented so they too can be replaced by a ASCII representation or HEX value such as:
"id=999999%20or%20select%20char(42)%20from cctable"

This type of encoding makes reading and understanding what type of SQL commands the attacker is sending, very difficult. So I wrote an EnScript that does a simple search and replace for seveal types of encoding in order to make it easier to understand what the attacker was doing. This can also help in keyword searching in case the word you were searching for was encoded it obviously would not be found in its encoded form.

The following is an example of a real encoded IIS weblog entry:
pageid=830%20And%20(Select%20Top%201%20char(124)%2Bname%2Bchar(124)%20From%20(Select%20Top%201%20[name]%20From%20[syscolumns]%20where%20(id%20=%20(SELECT%20TOP%201%20id%20FROM%20[sysobjects]%20WHERE%20name%20=%20char(112)%2Bchar(97)%2Bchar(103)%2Bchar(101)%2Bchar(99)%2Bchar(111)%2Bchar(110)%2Bchar(116)%2Bchar(101)%2Bchar(110)%2Bchar(116)%2Bchar(115)))%20Order%20by%20[name])%20T%20Order%20by%20[name]%20desc)>0%20--

The decoded entry looks like this:
pageid=830 And (Select Top 1 +name+ From (Select Top 1 [name] From [syscolumns] where (id = (SELECT TOP 1 id FROM [sysobjects] WHERE name = p+a+g+e+c+o+n+t+e+n+t+s)) Order by [name]) T Order by [name] desc)>0 --

To use within EnCase, select (blue check) the IIS log and then run the EnScript, check the console for results.

Download Here
(tested in v6.5)

Sunday, July 22, 2007

Export EnCase evidence file to DD image

I had a need to convert an EnCase image file to a DD image. There are several ways to do this, but many require using 3rd party tools or restoring the original drive. So I wrote an EnScript that can do it natively within EnCase preventing me from having to use 3rd party tools.

Wen you run the EnScript, it will write the DD image to your default export folder (so remember to set it correctly) and name it the same as your evidence. Obviously, the normal rules apply of writing a file out to a file system that has size limitations (FAT), so consider that when exporting your DD image and use the appropriate file system that can deal with large files. I may add the ability to "split" the files in the future.

Speed is not blazing fast, but it works.. ;) You can estimate about 1GB per minute for an average computer system.

One exported, the MD5 hash of the DD file should verify with any 3rd party tool to be the same as what EnCase reports. MD5 reported by EnCase:


MD5 reported by WinHex on exported DD file:


Download Here

Tested in EnCase v6.5

Saturday, July 21, 2007

USB Device History EnScript

I finally got around to updating my USB device History EnScript to extract some additional information. The EnScript now extracts and lists all previously connected USB devices via the USBSTOR key, then lists all the devices from the DeviceClass keys, then lists all the Mounted Devices, their associated assigned drive letters and then attempts to map a drive letter to any of the previously connected USB devices, if the information still remains.

The output is to the Console tab for now until testing is finished. The output is tab-delimited so it can easily be copied to the clipboard and then pasted to Excel or saved to a file and then imported into Excel.

Tested in Windows 2000, Windows XP, Windows 2003 & Vista

Download Here
(v6)

Download Here
(v5)

Wednesday, July 18, 2007

Recovering MFT records from unallocated space or $Logfile

The $Logfile in NTFS file systems is a transaction journal of changes to the $MFT. You can commonly find file fragments and MFT records in this file. You can also sometimes find MFT records in unallocated space. MFT records are fairly easy to read once you know the structure, but I wanted an easier what to extract them and put them in a report type display. The value of searching and looking for old MFT records is that you can often find MFT records that show the filename of a file that no longer exists and extract the metadata about that file, such as timestamps and what the parent folder was.

To use this EnScript, conduct a keyword search for the MFT record header of 'FILE'. A good keyword is FILE[0\*] marked as GREP and case sensitive. Search the $Logfile, unallocated or any other file you want. Once the search is completed, view the results and select (blue check) the search hits you want to extract into readable text:


Once you have selected certain search hits (or all of them) run the EnScript and look in the console. Valid MFT records will be decoded and written out into the Console for easy reading and you can copy and paste into a report if you wish:


In the future I will add the search function into the script itself so you don't have to manually perform the search, I was just lazy and wrote it to fulfill a quick need. I also have an Enscript that will decode INDX (directory entries) records found in the $logfile (or any other file you wish) which I will publish soon.

Tested in v6.5
Download Here

Adding Hash values to an existing .hash file in EnCase

In my previous post I explained that in the past I have had the need to import hash values from a text file into an EnCase .hash file for use by EnCase and therefore I created an EnScript to import from a text file. In addition, I have also had the need to add hashes to an existing .hash file in EnCase.

You can easily make a hash set in EnCase, but you cannot add to an existing hash set within EnCase. To make matters worse, what if you don't have the files that were used to create a hash set, for example, if the hash set was given to you by another examiner? You would have to create a new hash set with the new files and then also keep the existing one.

Therefore, I wrote an EnScript to hash and then add selected (blue checked) files into an existing EnCase .hash set. The main purpose for writing this was so I could continually add hash values of hacker tools or malware into one hash set, without having to have or maintain the original files to rehash them in order to make a new hash set.

Enjoy.. (tested in v6.5)

Download Here

Tuesday, July 17, 2007

Importing hash values from a text file into EnCase

While doing an compartmentalized team investigation, I had a need to look for several dozen files that I did not actually have possession of as they were collected by another group. I was given a text file with the hash values of the files I was instructed to look for. I needed a quick way to import the hash values into a hash set for EnCase.

This EnScript reads a simple comma delimited text file with 3 fields per line; filename,size,hash. The name and size are ignored (the file was made by a third party utility) and the hash value is read in and a .hash file is created for use by EnCase.


Download Here

EnCase EnScript to quickly sort last written timestamps on registry keys

One of the many analysis techniques that I use when looking at compromised computers is to analyze registry keys and the last written date on the various keys. If I have a time frame that I am focusing on based on some other type of artifact, I commonly look at all the registry keys that have a last written date near my target date.

I wrote an EnCase EnScript to mount the registry hives and then dump all the registry keys and their last written dates into a Bookmark Log Record view so I could then sort them, export them, print them or whatever. Commonly I used to just mount the registry hives and then select the "show all" and then sort the files and registry keys at the same time and in the same view. That method is still a valuable one, but I wrote this so I could make bookmarks and separate the registry keys into their own bookmark area for closer analysis.

To use this EnScript, copy to your EnCase EnScript folder and then refresh your EnScript folder in EnCase (if EnCase is currently running). Simply double-click on the EnScript and it will mount the registry hives and dump the data in the bookmark tab, log records subtab.

*Note that the Bookmarks->Log Records tab has a hard-coded column named "Last Accessed", although registry keys only have a last written timestamp. I have populated that column with the last written timestamps.

Download Here

Saturday, July 14, 2007

Obtain Service Pack/Patch information quickly in EnCase

In almost every forensic report that I write, I include the OS type, service pack level and patches that have been applied to the OS. This information sets the foundation as to what level of OS is installed and starts to give indications as to what is possible in terms of exploits against this machine.

This is a quick EnScript I wrote to extract this information from the registry and print to the console tab of EnCase so I could copy and paste all or a portion of it into a forensic report.

*note - this currently does not work on Vista

Download Here

Tuesday, July 10, 2007

Vista Bitlocker in EnCase

During CEIC 2007, Dominik Weber gave a great presentation on Vista Bitlocker and how EnCase supports viewing Bitlocked drives. This presentation is a high-level overview of the various Vista bitlocker features and some things an investigator should be aware of when conducting forensics involving a bitlocker drive.

Download Here

Office Metadata EnScript

A colleague in South Africa (peace OB) asked me for a script that could quickly kick out MS Word MetaData to the console and bookmark them for review. This is a pretty specialized EnScript, but I figured others may have the same need.

Here is sample output in the Console:


Download Here

Sunday, July 8, 2007

UserAssist Registy Keys EnScript

A lot has been written about the UserAssist keys and their value, no need to repeat the same mantra.

This is an EnCase EnScript I wrote several years ago to decode and bookmark (and export) the UserAssist keys for all users.

Download Here

You also need to download this Include file and place it in your \Program Files\EnCase6\EnScript\Include folder:

Include File

Wednesday, July 4, 2007

Exporting Program Icons EnScript

One of the other techniques I often use when looking for malware, hacking tools and other signs of malfeasance is to examine the program icons in various programs. Icons are embedded inside each executable file. Not all executables have icons, but ones that do might indicate something is wrong. For example:

You locate a file named svchost.exe and it does not match any hash set that you have. You scan it with anti-virus and nothing is detected. You export the file and see the following:


Obviously something is not right. Recognizing a icon like this is an easy way to identify problems. Now, there are other ways to probe a file and determine its purpose , but I wrote this script to kick out all the icons in selected (blue checked) executables so I could quickly visually scan them (low-hanging fruit). If the executable does not have an embedded icon, then nothing is exported.

Additionally this could have some very interesting applications by creating a hashset of just icons. Then, regardless of the file's hash itself, by extracting and hashing the icon, you could possibly identify files by the icon alone, regardless of what the overall hash is of the file. This possible negates the issue of different hashes caused by different versions of the file as well as if the file has been altered, packed or compressed with a runtime packer, thus altering the file's hash.

To install, just copy the EnScript to your EnCase EnScript directory and then double click. It will ONLY process files that are selected (blue checked. It skips files that are selected, but not EXE). All icons of selected executables are exported to your default export folder in .ico format so you can set your Windows Explorer folder view to thumbnails and view them quickly.

Download Here

Monday, June 18, 2007

Windows Vista Forensic Artifacts

I recently presented at CEIC 2007 on Microsoft Windows Vista forensics. The presentation was a brief overview of new features and artifacts that Vista creates as well as some changes in the way Vista does certain things, such as Windows Mail, the recycle bin, etc.

The presentation can be viewed here:
Download Here

Wednesday, June 6, 2007

Extracting quarantined files from Norton 7.5 in EnCase

When Norton 7.5 (Corporate) locates a file it recognizes as malware, if quarantine is enabled, it will encrypt that file using XOR and rename it with a .VBN extension. It is important when doing an investigation that you examine the quarantine logs and extract any files that are quarantined so you can obbtain a hash and perform an analysis.

When a file is quarantined by Norton (and XOR encrypted) it will not be located by an external AV scan, or by any type of hash analysis because it is now in an XOR encrypted state.

This EnScript recurses through any files with .VBN extension and then decrypts the file and exports it so you can scan it or obtain a hash.


Download Here

Saturday, June 2, 2007

Command line IR tools

I am frequently asked during various training events and engagements if I have a list of command line tools that I use for incident response activities. While I commonly use EnCase to do my Incident Response, I have had a need for various command line incident response tools in the past so I created a spreadsheet with the various tools, what they did and where to find them:

Download Here

Monday, May 21, 2007

Creating "Dummy" files of a specific size for testing purposes

I was doing some testing on the NTFS file system and was watching how files are moved in and out of the MFT when they are small enough to it inside the MFT and be resident. I found myself creating a text file and then trying to get it to certain size to do my testing. I then found it easier to make an EnCase EnScript to create these "dummy" files for my testing. I then figured I might use the utility outside of EnCase so I then wrote a utility in Perl and compiled it to run in Windows.

Basically the program will create a "dummy" file with the name you specify, with the size you specify. The syntax is:


Download Here

Sunday, May 20, 2007

How to connect to a remote computer with EnCase Enterprise that is behind a firewall

A few years ago, I was asked if there was a way to use EnCase Enterprise to connect to a remote machine that may be located behind a firewall. The scenario I was given was what if an Investigator wanted to connect to a computer located inside a Internet Cafe to collect information during an investigation, but didn't want to solicit the help from the Internet Cafe owner/employee? I came up with a simple way to accomplish this with no regard to the legal ramifications since that was not part of the problem presented to me and should be considered by the person performing this.

There are some equipment prerequisites that you need to accomplish this:
1. EnCase Enterprise/FIM
2. A public accessible SSH server

In addition, this solution requires that someone (an additional investigator) enter the Internet Cafe and have physical access to the computer you wish to preview or collect information from. Administrative access is not required and there is no need to install anything or reboot.

The scenario would be something like an investigator doing surveillance on someone who uses an Internet Cafe and then when that person leaves, an investigator would enter and pretend to use the computer that the suspect just used. The investigator would use a floppy disk or flash drive to start the necessary applications and config and then a remote investigator could connect to the computer in the Internet Cafe using EnCase Enterprise and collect information (image, preview, etc.).

The following PDF details how to accomplish this:

Download Here
.

*Note: This solution was originally written several years ago for EnCase v4 and works in all subsequent versions, but in EnCase v6 there is an easier way to accomplish this with no need to use 3rd party software (SSH), but administrative access is required to the machine you wish to preview.

Computer Forensics, Malware Analysis & Digital Investigations

Random Articles